TOPAZ LABS BW EFFECTS 2 FULL REVIEW – UPDATED

Topaz Labs BW Effects 2 Full Review, an in-depth review of what I consider one of the best black and white converting plugins on the market
LATEST UPDATE
This is an updated and enriched version of the very popular Topaz Labs BW Effects 2 Full Review, which I first wrote when Topaz BW Effects 2 was launched. It is a complete evaluation of my main black and white converter and the plugin I use the most in my work, together with the new Topaz AI plugins, as DeNoise AI (the best denoiser I have ever worked with), Sharpen AI (a great sharpener), Adjust AI (which is great also for when I work in color), Mask AI (the best mask and selection creator that can save you hours of editing in Photoshop), Gigapixel AI (fantastic tool for enlarging images and preparing for print).
I consider the Topaz collection the most advanced and complete set of plugins on the market today and I use many of the plugins it comprises when working on my photographs. Especially now that many of these plugins can be found in Topaz Studio 2 too, with AI technology incorporated, there is no limit to what you can do with Topaz.
NOTE:
I make a demo on how to use Topaz BW Effects 2 and the other Topaz plugins at my workshops, together with a walk through my entire black and white processing workflow Photography Drawing™, to show how I process the award-winning images that brought me the highest distinctions, like Photographer of the Year IPA International Photography Awards. As you can imagine, this is one of my most popular courses.
I am working with the Topaz Labs Collection and especially the BW Effects 2 plugin for a few years already and the experience was always great. The Topaz software helps me a great deal in creating my fine art black and white photography and it simplifies a lot the workflow I’m using. I couldn’t take it out of my workflow without making my life much harder. Since I have such a good experience with the Topaz Labs software, and the BW Effects especially, I’d like to share with you my impressions updated now after working with the plugin for some years already. Besides my impressions, since this collection is really worth it, I will also share a discount code for 15% off for any Topaz product: plugins, AI Bundle, Topaz Studio etc. How to get it? Just click on the link below, then use the discount code JULIAG when ordering.
SPECIAL HOLIDAY PROMO UP TO 30% OFF – ENDS DEC 31, 2022
Order Topaz Labs plugins – 15% OFF with code JULIAG
NEW! TOPAZ AI BUNDLE – 15% OFF – CODE: JULIAG
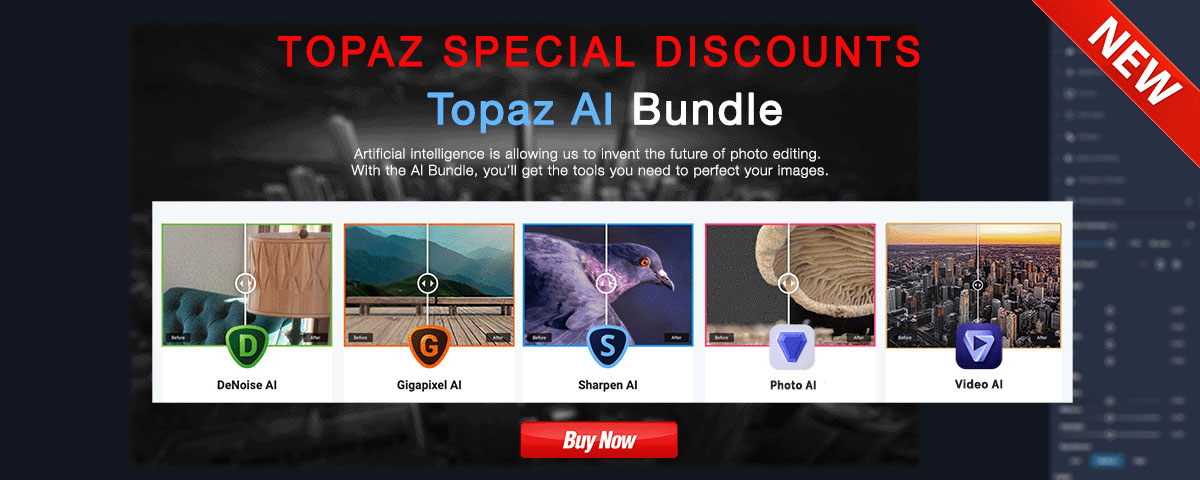
Some new and amazing tools are available from Topaz this year: the Topaz AI Bundle containing so far 5 AI plugins (more to come) that use artificial intelligence in editing and I can tell you they are all amazing. DeNoise AI, Gigapixel AI (image enlargement), Sharpen AI, JPEG to RAW, Adjust AI, you definitely need to have them and you can save 140$ if you order the bundle + 15% OFF with the code JULIAG from the link above.
Topaz AI Bundle Special Discounts
Some new and amazing tools are available from Topaz this year: the Topaz AI Bundle containing so far 5 AI plugins (more to come) that use artificial intelligence in editing and I can tell you they are all amazing. DeNoise AI, Gigapixel AI (image enlargement), Sharpen AI, Photo AI, Video AI, you definitely need to have them and you can get excellent discounts for the bundle from the link above.
NEW! TOPAZ STUDIO – 15% OFF – CODE: JULIAG
The new Topaz Studio 2 is finally out and it is a very powerful and impressive tool – a standalone editor, a plugin within Lightroom and Photoshop, or a host application for your other Topaz plugins. You can get it with a 15% OFF discount with the code JULIAG from the link above. Discount applied at checkout. Topaz Studio 2 gives you the ultimate control and speed in your processing.
If you want to read more extensively about how I use the entire collection of Topaz plugins, and mostly the BW Effects, you can find many more info and tips about it, also about the process of creation of my work (envisioning + capturing + processing) and a lot more on black and white photography, long exposure, architectural photography etc., in the 424-page book From Basics to Fine Art – Black and White Photography, written with co-author Joel Tjintjelaar.
And now let me tell you about my experience with BW Effects 2 and the Topaz Labs Collection.
Below is an image I processed mostly in Topaz BW Effects and refined the details in Photoshop. I will present to you all the things you can create in your photography if you work with Topaz BW Effects and explain how to use it.
This image is a long exposure of 77 sec. shot at f/11, ISO 100 with a Nikon 10-24mm lens and a 13-stop Formatt-Hitech ND filter. As a heads-up, keep in mind that you can order any Formatt-Hitech filter or accessory with 10% discount if you use my code JULIA10 from Formatt-Hitech UK website or from Formatt-Hitech USA website.
Speaking of long exposure, since this is one of the techniques I use extensively in my photography, if you want to learn it you can read my Ultimate Long Exposure Photography Tutorial that is a complete guide to this fascinating technique, and you can also purchase my video tutorial Long Exposure, Architecture, Fine Art Photography – Creating (en)Visionography where I describe everything live while talking about architecture photography, fine art and (en)Visionography. The video also comes with an eBook where I present my black and white processing workflow.

Introduction – What a black and white converter can do for your work
The first thing I want to mention in this Topaz Labs BW Effects 2 Full Review, is regarding the results you can expect to get from using BW Effects 2 or any other black and white converter you would use. I would like to say that the results you see in my images cannot be obtained by using a plugin solely, or even more plugins together without further editing. The result you see involves much more than that, especially as far as the treatment of the details, the use of local contrast and light shaping to create presence and depth in the image. These are things that require very special care and accuracy and can only be realized by working topically and meticulously. So don’t expect wonders by just pushing a button, I can’t promise them.
You can read about the principles I follow when working on my black and white photographs in my complete guide to black and white photography where I go into detail about how to create a great monochrome image.
Having said that, a black and white plugin helps a lot and there are things that you can do with Topaz BW Effects 2. but that you couldn’t recreate in Photoshop or Lightroom. For instance, enhancing the micro details using a region-based algorithm that can help define the mid-tones by just moving a slider. Or adding grain that is created by studying and recreating real film grain. Also painting different effects on the image with a very easy mask system that is automatically created by the program.
BW Effects and the entire Topaz collection are very good tools that help me in a substantial way when working with my black and white processing technique Photography Drawing. You can read a tutorial on my blog analyzing how to work with Photography Drawing. Also, you can read another tutorial I made for the Topaz blog some time ago, treating my black and white processing workflow with Photography Drawing (PhtD).

Presenting Topaz BW Effects – General overview and comparison with other versions
Topaz BW Effects 2 has been released in February 2013 and is overall a great plugin, better than the previous version from a lot of points of view and generally a very good tool for black and white converting. I’ll try here to present a few things that I like and some of the things that changed from the version I knew previously.
I have worked with the first edition of BW Effects and it was a very good plugin, but the 2nd edition, the BW Effects 2 is really impressive. First, it has a new interface, very modern and clean, intuitive and easy to use. Then, it’s much quicker. If you know the first BW Effects you will know that you had to wait quite a bit for your file to be updated as you were applying different edits to it.
Good news, the second edition is much quicker and I love this as I love speed by nature, I hate to wait for things to be done, so that suits my processing style perfectly. Don’t get distracted by the fact that I’m not producing images in a speedy rhythm, this is happening because I believe in quality, not in quantity, also because I tend to be very reluctant to post anything that would not fulfill my standards 100%, and my standards are really high. Then because every image for me is not just a simple image, but a chance to delve into studying everything related, from the technical part to the very subjective idea of how an image and the vision behind it was born, first in our mind and soul and then on our camera sensors and screens. But once I know what I want, I need speed to create it so I don’t lose the perfect connection I have with my images when I work on them.
Power of control in BW Effects
Black and White Presets
To come back to our review, I find that in the new BW Effects 2 there is much more control and subtlety than before. It’s really a very versatile program and if you like that, it has a multitude of presets to work with. Even if I’m not working too much with presets, I’m impressed, there are more than 200 presets built into BW Effects 2, some of them so good that they are almost doing the work for you. Definitely a great starting point for any kind of black and white editing. Not to mention that the preview of the presets now is truly huge, making it very easy to decide which way to go without actually applying it.
Mid-Grays – Controlling gray tones
What I like a lot about Topaz BW Effects 2 is that you have great control over the mid-grays. If you know me, you’ll know I love mid-grays. Some say that a great black and white photograph is one that has a good black and a good white. I agree with that but most people forget about the importance of the mid-gray tones, which are the ones who add richness to the image and in my opinion the ones who tell the story of a photograph. Contrast attracts, but gray tones keep the viewer into the image exploring it and finding the meaning. This is what gives substance to a black and white image and makes it consistent. I find BW Effects 2 handles the mid-grays in a very subtle and precise way.
Converting to black and white with Topaz BW Effects
This image has been converted to black and white and edited partly in Topaz BW Effects 2, partly in Photoshop. Most of the work has been done in BW Effects with just the details of the light shaping to be added in Photoshop. More or less what I’m doing in any black and white converter. You can see below how the image looked when it came out from BW Effects 2 and before the detail tweaking and final touches were added in PS. It was already looking great when it came out from the Topaz plugin, for some it could even look like a finished image, but I always need to go further and put more of myself in the final result. It’s just my style and my need to bring the image closer to what I have in mind.

(Click to enlarge)
Highlights of BW Effects plugin
Huge amount of presets, huge preview window

(Click to enlarge)
I was talking about the presets earlier and I am coming back to them for a more detailed description. The presentation of the result you would have if using the preset is very large and showed very comfortably so you don’t even need to apply the preset to understand how it would look if you did. This is a very good tool and saves you a lot of time. You can now see the presets as a grid view with large previews so you can easily compare. I really like this feature, it’s very intuitive and reminds in a way of the old days of film when you were checking contact sheets choosing the right images. There are presets in these collections that are so good that they are almost like a finished image, some are very stylized but a lot of the classical ones are really useful as starting point for any kind of black and white converting. I’m not really a fan of presets, actually what I like in my images is to start from the most neutral version that I can get so I can have total control over the final result, but I think I still use some of these presets quite intensively, as a great starting point, especially for some kind of images. Another good thing and quite helpful, if you need to use some presets more frequently, is that you can add it to favorites to find it easier. Also, you can save your own presets to My Collection and use them later.
Zone Mode – Zone System Checker – Gray tones mapping

(Click to enlarge)
A truly useful feature and a feature that I absolutely love and that I thought I can only find in NIK SEP 2 is a Zone system checker called Zone Mode, which can show you the areas in the image belonging to a certain zone in the well-known Ansel Adams Zone System. It is a feature I use all the time in my workflow checking my tones to keep a balance between them and in the entire image and it helps me cover the entire tonal range in my images. You can choose to have either the thumbnail preview or the Zone Mode visible. What I really like about it is that you can either click on the image or on the zone checker in the Zone Mode and it shows you either what zone you’re on (if you click on the image) or where is the zone you choose (if you click on the Zone Mode checker).
Quick Tools Menu
Right under the preview thumbnail, you can find a Quick Tools Menu where you can tweak a lot of functions without getting deeper into the interface: color filters, exposure, contrast, adaptive exposure, detail, dodge & burn brushes etc., all of them can be found there and used without even clicking another button. Very time-saving and intuitive. And you can hide the quick tools menu as well, if you want a cleaner look.
Realistic Grain Styles and Textures
You can find a wide range of film grains, covering the most well-known film types, with very realistic textures that can be even enhanced as you can tweak the size and contrast of the grain to suit different developing styles. I like a lot the Ilford FP4 Plus 125, the Kodak TmaxPro 100 and the Kodak Pro PlusX 125. They have just the right texture and size right from the start and they remind me of the real film grain I used to see in the old days. In the image I processed here I used a combination of Photoshop grain and I added a touch of Kodak Pro PlusX 125 in Topaz and I’m very happy with the result.
Make a snapshot and compare later
A very useful feature is the possibility to take “snapshots” (up to 99 snapshots) which can be different steps in your processing, steps that you don’t want to lose. You can save these steps separately so you can compare them and decide later. You can find the snapshots in a separate panel and you can also review them in a grid preview. Also, you can export or save them as presets so you don’t lose them when you close the interface as it was happening in the first version.
Smooth Sliders in the Edit panels
One thing I noticed in the second edition is that the sliders you can find in the editing panel are now much smoother and easier to control, they were kind of hard to control in the past.
Color Filters – Red filter is the Star
An effective tool that I use a lot is the color filters. The red filter especially is one of my favorites since it works so well in darkening the sky. It’s definitely something to try if you want to get the “dark sky” effect that I extensively use in my architectural images. Good news, no banding appears even if you push the effect to quite high values.
But there are also other useful color filters that you can try: orange, yellow, blue, green. You can find them all in BW Effects and in this release, they are very well placed and easy to use, plus very easily adjustable as for hue and intensity. They can be reached from their dedicated panel, but also in the quick menu.
100% Loupe View
Another thing I like to work with, the new loupe used to check the image locally, similar to the one in NIK Silver Efex Pro 2, where you can see the image at 100% zoom without zooming in the main window.
Background color, Split screen – Before/After View, Collapse Unused Panels
Some of the other general features that can be very helpful and effective, a few of them new to this edition, are: the possibility to change the background color of the working surface to light/dark grey plus black/white, so you can choose the one that makes the image pop the most; the option to split the screen with before/after views or to hide the side panels so you can use more of the screen as active working space.
Tips: A thing to keep in mind is to duplicate the layer you import into BW Effects 2
One important thing you have to keep in mind when you open your image to edit it in a Topaz plugin (Topaz Black and White Effects 2 included) is that you need to duplicate your layer before opening the image in Topaz, since the program doesn’t automatically save a new layer with the processed image when you come back to Photoshop. If you ask me, it would be a good feature to add, I find myself very often forgetting to duplicate that layer before I open Topaz.
Now let’s talk about the main interface, where most of the controls can be found.
THE MAIN CONTROL PANEL
This panel is the heart of the program and can be found on the right side of the working interface being structured into 4 categories: Conversion, Creative Effects, Local Adjustments and Finishing Touches.
What I’m mostly using out of these features are: Conversion, Local Adjustments and some of the Finishing Touches, like Film Grain, Edge Exposure and Vignette.
There are more interesting features that can give a very special look to the image, but I’m not using them very much, as they don’t suit my style. But let me mention them since they can be very useful if used in the right image. I’m talking about the controls you can find in the Creative Effects: Simplify, Diffusion, Posterize and Camera Shake or in the Finishing Touches: Border, Vignette, Edge Exposure, Transparency (here you can bring back color into the image in a controlled mode), Silver & Paper Tone, Quad Tone (this feature controls the hues in a black and white image focusing on 4 different tonal regions and is a very powerful tool for toning an image and a really special one too, as I don’t think it exists on any other black and white plugin on the market).
A few words about each of the main categories.
1/ CONVERSION

(Click to enlarge)
The first category of the main menu consists of tools used to convert the image to black and white, working in a general manner, but affecting the image in different ways, based on brightness/contrast, or color distribution, detail and interaction between different tones etc.
Basic exposure
Tweak your contrast, brightness, boost blacks and whites in a general manner The controls are smoother than in the first version of the program and more effective.
Adaptive Exposure
Tweak the Adaptive Exposure, Regions, Detail, protect Shadows and Highlights, Boost Detail and do it as generally or locally you need.
Possibly the most complex feature of the program and the one I like best so I have to talk about it in this Topaz Labs BW Effects 2 Full Review. What it does is to work on the dynamic range of the image, tweaking/enhancing the detail and tonal values throughout the tonal zones of the image. What I like best is to use it to work with the mid-tones to give them substance or to enhance the micro-detail that will make the mid-tones pop. It uses an algorithm based on regions, that can be as large or small as you need them to be and on applying the effect on a smaller or larger scale, according to how big you choose the regions to be. This gives a great localized control that makes me think of luminosity masks and the amount of control you can have using them, which is a great one. I really like what you can do with these controls, even if it doesn’t show very well on this image since the subject is quite small and we don’t have large areas of mid-greys.
Color sensitivity
This works very much like the corresponding tool in PS and LR. I suppose everyone knows the feature, so I won’t insist on it. What it does in two words is to change the luminosity of each color in the image, so the area that contains that specific color will show brighter or darker in black and white.
Color Filter
Another well-known feature for a black and white converter, it can be found in PS and NIK SEP2 too, it recreated the effect a colored filter would have to the image if placed in front of the lens, a technique very popular in the days of film. The intensity, as well as the hue of the applied filter, can both be controlled by using the sliders.
Curve Tool
It is the well-known Curve tool that controls contrast and the intensity of bright and dark tones, what is interesting is the 8 presets it has incorporated that are very useful and quick to use. Among them also a negative function that will show the image as a film negative.
2/ CREATIVE EFFECTS

(Click to enlarge)
Consists of different effects you can apply to the image, Simplify, Diffusion, Posterize and Camera Shake, to give different aspects more or less realistic. I’m not using them much, but I find 2 of them very interesting: the Diffusion (what a diffusion filter placed in front of the lens would do) and the Camera Shake (recreates an ICM – Intentional Camera Movement effect in the image).
3/ LOCAL ADJUSTMENTS

(Click to enlarge)
Here you can use the brush to locally Dodge, Burn, Smooth, enhance Detail or bring Color back to the image through transparency.
Edge Aware Function
Tip: You can use edge-aware it instead of making selections in Photoshop
One of the best tools in Topaz BW Effects is the Edge Aware function. If you use it you can avoid making a lot of the selections you make in Photoshop because the way it functions is close to the result you get when using selections. This tool helps you work well with enhancing detail, for instance, on just portions of the image but not on others, depending on the edge that separates them (for instance enhance detail in a building but not in the sky). The same function works with the dodge and burn control, with smoothing a region and with color control, even if I don’t think I’ll even use that since what it does is to selectively bring color back into the black and white image, which I never work with. But it’s interesting for creating some muted color effects that can suit some images. Every move you do can be seen on a mask, separate for each effect you use it with, and if you don’t like what you did, there is an Erase brush as well available to remove the effect, totally or partially.
Absolutely one of my favorite tools in Topaz Black and White Effects. You can see below how good the results of using this function are, as I used it in creating my image Fluid Time II.

4/ FINISHING TOUCHES

(Click to enlarge)
Silver & Paper Tone
Adds toning to either your paper or the silver that creates the image on the paper, or to both. It is based on techniques used in the traditional darkroom and it recreates a lot of these effects very realistically.
Quad Tone
This feature controls the hues in a black and white image focusing on 4 different tonal regions and is a very powerful tool for toning an image and a really special one too, as I don’t think it exists on any other black and white plugin on the market).
Film Grain
Here you can find a wide range of film grains, covering the most well-known film types, with very realistic textures that can be even enhanced as you can tweak the size and contrast of the grain to suit different developing styles.
Border
A multitude of image border styles to add to the image.

(Click to enlarge)
Edge Exposure
Comparable to the NIK SEP2 Edge Burn effect, it increases or decreases the exposure along the border, working in the same way a gradient would work in PS.
Vignette
It adds different types, shapes, intensities of vignette placed centrally in the image or in whichever point we would choose.
Transparency
Here you can bring back color into the image in a controlled mode.
And since nothing ever can be perfect, BW Effect 2 can be even better.
What can be improved?
1/ – I would add a point picker to the Curve Tool, to be able to adjust the tones by picking them right in the image.
2/ – I would make the Edge Exposure smoother, it’s a bit too responsive, something that stands for NIK SEP 2 as well and that is why I still use Photoshop to apply most of my gradients, the smoothness of the PS gradients is still the best.
3/ – I would make the brush size easier to modify, as far as size is concerned, but this is a request I’d have for all the programs I work with. I think only Lightroom is easy enough in this regard as you can use the mouse wheel to change your size.
4/ – I would add the possibility to build the Local Adjustments one on the top of another by adding a new mask for each new effect of the same category we want to add to the previous one. This would give more control and would increase the subtlety of working with Local Adjustments.
5/ – I would make the default for the program to save the result back into Photoshop in a new layer.
CONCLUSION of my Topaz Labs BW Effects 2 Full Review
I hope you found this Topaz Labs BW Effects 2 Full Review useful. As for me, I am working with the Topaz BW Effects 2 plugin (and generally the Topaz Collection) in my typical black and white workflow as I found many features of the program that give me great results and help me get closer to my vision in a very easy way. I was exclusively using Google NIK SEP2 in the past, but there were features I needed that I couldn’t find there. Happily, I can find a lot of them in Topaz BW Effects 2 so for those who are wondering, I think the best results can be obtained by using both plugins, as they are equally good in my opinion and complete each other. So, if you are already using Google NIK or other brands, be sure you try Topaz BW Effects and you will surely love its flexibility and easiness to use and most probably make it your main black and white converter.
TOPAZ LABS COLLECTION
The Topaz collection is undoubtedly the largest on the market and it covers everything you may think of, from fine art photography to street of portraiture. In my opinion, if you own this collection you don’t need much else and you will be able to use only one set of plugins. For the things the Topaz plugins do, they are the best and I would warmly recommend you to try them. You will be surely convinced by the versatility and the flexibility they offer and also for the easiness of working with them while producing high-quality results.
There are a few of the presets of the Topaz collection I really like and use frequently. To name a few: the new Topaz AI plugins, as DeNoise AI (the best denoiser I have ever worked with), Sharpen AI (a great sharpener), Adjust AI (great also for when I work in color), Mask AI (the best mask and selection creator that can save you hours of editing in Photoshop), Gigapixel AI (as I mentioned earlier, fantastic tool for enlarging images and preparing for print). These plugins are among the ones I like and use most, but I also sometimes use Topaz Clean or Topaz Lens Effects.
In conclusion, just as in the case of BW Effects 2, I adopted the entire collection as soon as I tried it and I use it in my workflow as it completes in a perfect way the other processing tools I’m using.
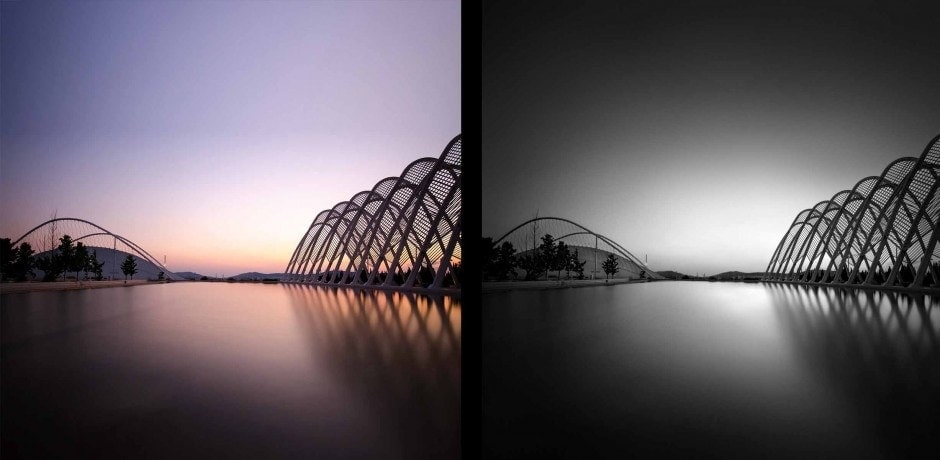
About the image “Last Light”
This image was shot in the Athens Olympic Complex and it shows the Agora and Velodrome, both designed by Santiago Calatrava.
Before/After
Here is a before-after of this image so you can see where I started from and where I ended at by using the BW Effects and the rest of Topaz Collection and Photoshop.
FINAL NOTE
Don’t forget you can use the code JULIAG that I have from Topaz for my followers if you want to get any of the Topaz plugins or the entire collection with 15% discount when ordering from this link.
FURTHER STUDY RESOURCES
FINE ART BLACK AND WHITE PHOTOGRAPHY, ARCHITECTURAL PHOTOGRAPHY, LONG EXPOSURE PHOTOGRAPHY
Find more resources about fine art black and white photography, (en)Visionography, long exposure photography and architecture photography in Julia Anna Gospodarou’s extensive collection of photography tutorials. To receive free future tutorials, you can subscribe here.
Learn more about how to create fine art photography, architectural photography, long exposure, etc. from conception to advanced processing in Julia’s video courses Understanding Fine Art Architecture Photography – The Complete Course, From Vision to Final Image – Mastering Black and White Photography Processing, in the video tutorial Long Exposure, Architecture, Fine Art Photography – Creating (en)Visionography, and the book From Basics to Fine Art – Black and White Photography, or by attending one of her highly appreciated workshops.
Find Julia’s recommendations for the best software and gear to create fine art photography, and curated deals and discounts for these tools.
To study with Julia Anna Gospodarou personally, find out about our
(en)VISIONOGRAPHY VOTED
FeedSpot TOP WORLD BLACK AND WHITE PHOTOGRAPHY BLOGS
Support our mission for high quality photography education. Donate now!
We believe in knowledge, education, and the freedom of spirit that creates great art. We believe in art and artists.
Please donate to help us continue sharing free high quality photography education and inspiration.
For more than one and a half decades, we have been sharing free content on fine art photography, black and white photography, architecture photography, long exposure photography, as well as our original concepts of “(en)Visionography” and “Photography Drawing”.
Thousands of photographers started their journey in fine art photography here and found inspiration and practical resources that empowered them. Many have won awards for their work and are making a career in photography based on knowledge acquired from our free tutorials, books, courses, and workshops.
This makes us incredibly proud of our work.
To empower even more photographers to reach their dreams, we want to keep this resource free forever so every new or advanced photographer can have access to knowledge, quality photography education, and inspiration.
To help us in our efforts, please consider becoming a patron of this cause with your recurring donations.
You will be part of a generous effort by other exquisite art and photography-loving patrons, and you can be proud of being a supporter of art and artists like the famous Maecenas of the past. Art and artists need your support, as always in the history of art and photography.
Thank you!
Julia Anna Gospodarou – Founder – (en)Visionographer
Founder of (en)Visionography™ and creator of Photography Drawing™, internationally acclaimed fine art photographer, Master architect, educator, and best-selling author, with 25+ years experience in photography and architecture, Julia Anna Gospodarou is a leader in modern fine art photography who shaped with her work the way architecture fine art photography looks today.
Awarded more than 100 times in the most important photography competitions worldwide, two-time International Photography Awards IPA Photographer of the Year, World Photography Awards SWPA, and Hasselblad Masters Finalist, her work was widely exhibited and published internationally.
With a passion for the world’s civilizations and speaking six languages, Julia was always in the avant-garde of thinking as an architect and a photographer, constantly pushing the limits of what is possible, constantly reinventing herself as an artist and an individual. Her huge love for travel and discoveries and her passion for teaching, art, and photography led her to become in the past one and a half decades one of the world’s top-rated fine art photography educators and workshop organizers.